Spring Boot Admin Server, Client config 설정하기
Spring Boot로 많은 프로젝트를 진행하게 됩니다. 많은 모니터링 도구가 있지만, Spring Boot 어플리케이션을 쉽게 모니터링 할 수 있는 방법을 소개하려고 합니다.
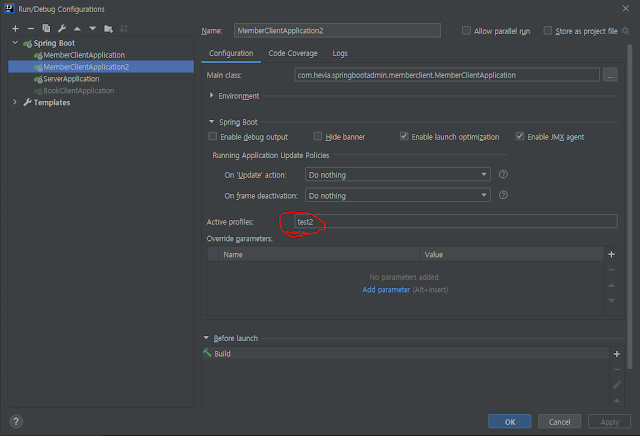
다른 프로파일로 실행하기 위해 MemberClientApplication2 실행환경을 추가하고 Active profiles를 추가로 설정합니다.
코드 중심으로 살펴보겠습니다.
1. 어드민 서버 구축
1-1. 디펜던시 추가
dependencies {
    // https://mvnrepository.com/artifact/de.codecentric/spring-boot-admin-starter-server
    implementation 'de.codecentric:spring-boot-admin-starter-server:2.5.4'
}
1-2. 어드민 서버 설정 활성화
@SpringBootApplication
@EnableAdminServer
public class ServerApplication {

    public static void main(String[] args) {
        SpringApplication.run(ServerApplication.class, args);
    }
}
EnableAdminServer를 하면 됩니다.
2. 클라이언트 서버 설정
예제는 book-client, member-client 2가지 클라이언트, member-client가 2개의 인스턴스 실행으로 작성했습니다.
2-1 디펜던시 추가
dependencies {
    // https://mvnrepository.com/artifact/org.springframework.boot/spring-boot-starter-web
    implementation 'org.springframework.boot:spring-boot-starter-web:2.5.4'
    // https://mvnrepository.com/artifact/org.springframework.boot/spring-boot-actuator
    implementation 'org.springframework.boot:spring-boot-starter-actuator:2.5.4'

    // https://mvnrepository.com/artifact/de.codecentric/spring-boot-admin-starter-client
    implementation 'de.codecentric:spring-boot-admin-starter-client:2.5.4'
}
Boot Admin을 활성화 하기 위해서는 actuator이 필요합니다.
2-2 application.yml 설정 수정
book-client/application.yml
server:
  port: 8081

spring:
  application:
    name: book-client
  boot:
    admin:
      client:
        url: http://localhost:8080

management:
  endpoints:
    web:
      exposure:
        include: health,httptrace,caches,metrics
로컬환경에서 모두 실행하기 때문에 server.port는 중복되지 않게 추가했습니다.
spring.application.name은 원하는것으로 하면 됩니다.
spring.boot.admin.client.url 은 어드민 서버의 URL입니다.
management.endpoints는 actuator의 설정입니다. 모니터링하기 원하는 값을 노출합니다.
member-client/application.yml
server:
  port: 8082

spring:
  application:
    name: member-client
  boot:
    admin:
      client:
        url: http://localhost:8080

management:
  endpoints:
    web:
      exposure:
        include: health,httptrace,caches,metrics
---
spring:
  config:
    activate:
      on-profile: test2

server:
  port: 8083
member 설정에서는 2개의 인스턴스 실행을 위해 profile 설정을 추가하여 다른 포트로 실행할 수 있도록 했습니다.
3. 실행
모든 서버를 실행합니다.
Application의 main함수에서 재생 버튼을 누르면 서버를 실행할 수 있습니다.
4가지 어플리케이션(sever, book-client, member-client, member-client2)를 모두 실행했으면 처음 이미지를 보실 수 있습니다.
주소는 다음과 같습니다.
http://localhost:8080/applications
아래 2개의 클라이언트가 보입니다. 클릭하면 상세지표를 볼 수 있습니다.
예제 코드 링크


댓글
댓글 쓰기