Spring Boot Admin Server, Client config 설정하기

이미지
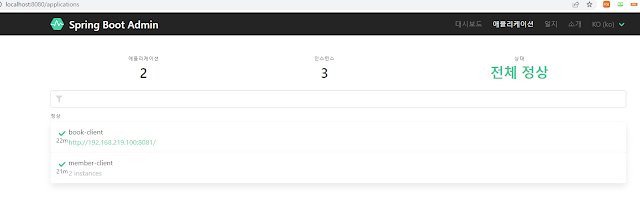
 Spring Boot로 많은 프로젝트를 진행하게 됩니다. 많은 모니터링 도구가 있지만, Spring Boot 어플리케이션을 쉽게 모니터링 할 수 있는 방법을 소개하려고 합니다.   코드 중심으로 살펴보겠습니다. 1. 어드민 서버 구축 1-1. 디펜던시 추가 dependencies { // https://mvnrepository.com/artifact/de.codecentric/spring-boot-admin-starter-server implementation 'de.codecentric:spring-boot-admin-starter-server:2.5.4' } 1-2. 어드민 서버 설정 활성화 @SpringBootApplication @EnableAdminServer public class ServerApplication { public static void main (String[] args) { SpringApplication. run (ServerApplication. class, args) ; } } EnableAdminServer를 하면 됩니다. 2. 클라이언트 서버 설정  예제는 book-client, member-client 2가지 클라이언트, member-client가 2개의 인스턴스 실행으로 작성했습니다.  2-1 디펜던시 추가 dependencies { // https://mvnrepository.com/artifact/org.springframework.boot/spring-boot-starter-web implementation 'org.springframework.boot:spring-boot-starter-web:2.5.4' // https://mvnrepository.com/artifact/org.springframework.boot/spring-boot-actuator implementation 'org.spring...

자바 URL 인코딩 디코딩

이미지
URL을 변수로 할당하여 개발할 때가 많이 있습니다. 예를 들어 소셜 로그인 후에 redirect_uri를 query string으로 전달 되는 것을 보실 수 있습니다. 이때 query string에  URL이 전달 되는경우에 인코딩을 해야 기대하는 결과를 받아 볼 수 있습니다. http://localhost?redirect_uri=https://www.youtube.com/watch?v=9PPaSkVIu98&list=all 위와 같이 전달하게 되면  redirect_uri  = https://www.youtube.com/watch?v=9PPaSkVIu98 list = all 원하지 않는 결과를 만나게 됩니다. 이외에 공백이라든지 특수문자를 사용하는 경우에도 인코딩해야합니다. 자바에서 인코딩, 디코딩 하는 방법을 살펴보겠습니다. @Test public void test () throws UnsupportedEncodingException { String url = "https://www.youtube.com/watch?v=9PPaSkVIu98" ; log .debug( "url === {}" , url) ; String encodedUrl = URLEncoder. encode (url , "UTF-8" ) ; log .debug( "encodedUrl === {}" , encodedUrl) ; String decodedUrl = URLDecoder. decode (encodedUrl , "UTF-8" ) ; log .debug( "decodedUrl === {}" , decodedUrl) ; } 실행 결과  url === https://www.youtube.com/watch?v=9PPaSkVIu98&list=all encodedUrl === https%3A%2F%2Fwww.youtube.com%2Fwatch...

자바 LocalDate json 변환에 관하여

이미지
 안녕하세요. 자바가 java.time 패키지를 제공하면서, 기존 Date 객체에 비하여 개발이 편해졌습니다. LocalDate를 json으로 변환하여 사용할때 만나는 문제를 다뤄보겠습니다. jackson 라이브러리를 사용하여 json으로 변환하고 다시 읽어 보겠습니다. jackson 라이브러리 json 변환 예제1 @Test public void objectMapper () throws JsonProcessingException { ObjectMapper objectMapper = new ObjectMapper() ; LocalDate ld = LocalDate. now () ; String json = objectMapper.writeValueAsString(ld) ; System. out .println( "json == " + json) ; LocalDate ldFromJson = objectMapper.readValue(json , LocalDate. class ) ; System. out .println( "ld1 == " + ld) ; System. out .println( "ld2 == " + ldFromJson) ; } 실행 결과1 json으로 변환할때 LocalDate의 모든 속성이 그대로 변환된 것을 볼 수 있습니다. 이경우 serializer, deserializer를 구현하여 형식을 정할 수 있습니다. jackson 라이브러리 json 변환 예제2 import java.time.LocalDate ; import java.time.format.DateTimeFormatter ; import com.fasterxml.jackson.core.JsonProcessingException ; import com.fasterxml.jackson.databind.ObjectMapper ; import com.fasterxml.jackson.databind.mo...

자바스크립트 Array 를 map 으로 변환, 일부만 변경, 합치기

javascript array to map Array(배열, 리스트, List)를 map으로 변환하여 특정키의 값이 존재하는지 여부를 찾고 싶을 때가 있습니다. (저는 자바를 주로 사용하기 때문에 자바 stream의 collect  사용하고 싶었습니다.) Array to map, list to map const books = [ { id : 'a' , name : '1' , author : 'q' } , { id : 'b' , name : '2' , author : 'w' } , { id : 'c' , name : '3' , author : 'e' } ] ; // array to map , list to map const bookMap = books. reduce ((acc , currentValue) => { acc[currentValue. id ] = currentValue ; return acc ; } , {}) ; console . log (bookMap) ; const newBooks = [ { id : 'b' , name : 'n2' , author : 'w' } , { id : 'c' , name : 'n3' , author : 'e' } , { id : 'd' , name : 'n4' , author : 'r' } , { id : 'f' , name : 'n5' , author : 't' } ] // 이전에 등록된 데이터 확인하기 const oldBooks = newBooks. filter (each => !bookMap[each. id ]) console . log (oldBooks) acc의 이전 결과 내...

Spring boot Webflux에서 block 찾기

이미지
Webflux로 개발하는 경우 block가 있으면 성능이 현저하게 낮아 집니다. 따라서 개발 후에 개발한 코드에 Block을 발생 시키는 코드가 있는지 확인하는 것은 중요합니다. 이것을 도와 주는 라이브러리가 Blockhound 입니다. 1. 의존성 추가 testImplementation( 'org.springframework.boot:spring-boot-starter-test' ) testImplementation 'io.projectreactor:reactor-test' testImplementation 'io.projectreactor.tools:blockhound:1.0.6.RELEASE' testImplementation 'io.projectreactor.tools:blockhound-junit-platform:1.0.6.RELEASE' Blockhound를 사용하면 Block을 발생시키는 곳에서 에러를 발생시킵니다. 따라서 운영 환경에서는 사용을 피해야 합니다. 테스트 환경에서 사용하는 것을 추천 드립니다. 2. 샘플 라우터 작성 @Configuration public class BlockingRouter { @Bean public RouterFunction<ServerResponse> blockRouter () { return RouterFunctions. route (RequestPredicates. GET ( "/nonBlock" ).and(RequestPredicates. accept (MediaType. APPLICATION_JSON )) , request -> { return ServerResponse. ok ().body(Mono. just ( "nonblock response" ) , String. class ) ; }).andRoute(RequestPredicates. GET ...

Spring boot webflux + mysql

스프링 부트의 webflux의 rest api 예제 입니다. 샘플 코드 https://github.com/withccm/spring-webflux-study/tree/feature/webflux-mysql-sample 북 테이블 CREATE TABLE `book` ( `id` int ( 11 ) NOT NULL AUTO_INCREMENT , `bookname` varchar ( 200 ) DEFAULT NULL , PRIMARY KEY (`id`) ) ; 1. 의존성 추가 implementation 'org.springframework.boot:spring-boot-starter-data-r2dbc' runtimeOnly 'mysql:mysql-connector-java' implementation 'dev.miku:r2dbc-mysql' 2. spring data r2dbc bean 등록 @Configuration @EnableTransactionManagement @EnableR2dbcRepositories public class DataSourceR2DBCConfig extends AbstractR2dbcConfiguration { @Bean @Primary public ConnectionFactory connectionFactory () { ConnectionFactoryOptions options = ConnectionFactoryOptions. builder () .option(ConnectionFactoryOptions. DRIVER , "pool" ) .option(ConnectionFactoryOptions. PROTOCOL , "mysql" ) .option(ConnectionFactoryOptions. HOST , "localhost" ...

AWS Amplify 이용하여 React 프로젝트 자동 빌드 배포

이미지
 AWS Amplify 는 클라이언트 애플리케이션 개발을 하도록 지원하는 도구입니다. 자세한 내용은 링크를 참고 부탁합니다. https://aws.amazon.com/ko/amplify/ Amplify 구성 1. 새로운 앱 생성 2. 연결할 저장소 선택 3. 리포지토리, 브랜치 선택 이때 자신의 리액트 프로젝트를 선택합니다. 4. 빌드 설정 구성은 특별히 변경할 필요없음. 5. 등록이 완료되면 자동을 빌드 배포가 진행됩니다. 이후 소스코드 변경이 있을 때 자동으로 프로젝트가 배포됩니다. 환경  변수 설정하기 1. 리액트에서 환경 변수 설정하기 상위 폴더에 .env 파일 생성하고 원하는 설정 추가 사용은 process.env. 를 통하여 합니다. axios . defaults . baseURL = process . env . REACT_APP_API_URL 2. Amplify 환경 변수 추가 앱 설정 > 환경 변수 메뉴 이미지와 같이 환경 변수를 추가하면 앱이 배포될때 포함되어 배포됩니다.

스프링 부트 프로파일 환경 설정 방법

이미지
Spring boot profile 환경 설정 방법 토이 프로젝트가 아닌 사용자에게 서비스할 프로젝트인 경우 개발 환경과 서비스 환경을 분리해서 구성해야할 필요가 있습니다. 스프링 부트 프로젝트 생성 https://start.spring.io/ 스프링 부트 프로젝트를 쉽게 세팅할 수 있다. 간단히 웹 디펜던시만 추가하였습니다. (세팅하는데 없어도 상관없습니다.) 파일을 분리하는 방법과 하나의 파일에 환경별로 작성하는 방법이 있습니다. 1. 파일을 분리하는 방법 파일 생성 및 구성 위의 이미지처럼 환경별로 파일을 생성합니다. application-{환경}.properties 예시는 로컬, 개발, 실서비스 3가지로 작성되었습니다. #application-local.properties logging.level.org.springframework = DEBUG #application-dev.properties logging.level.org.springframework = INFO #application-prod.properties logging.level.org.springframework = WARN 실행할 때 환경을 세팅하는 방법 1. 설정 파일에 정의하기 #application.properties spring.profiles.active = local 2. 실행할 때 주입하기 Active profiles: 원하는 환경 3. mvn 빌드시 설정 mvn -Dspring.profiles.active=prod spring-boot:run & 2. 하나의 파일에 환경별로 작성하는 방법 #application.yml --- spring : profiles : local, dev logging : level : org.springframework : DEBUG --- spring : profiles : test logging : level : org.springframework : INFO --- spring : profiles : ...